Yesterday was the first real day of spring, it was 20 deg C (68 deg F), sunny, insects flying everywhere and fruit trees blossoming... And I finally figured out how to keep our house warm in the winter. LOL! Well, we get there in the end.
With similar wonderful timing, last year at just this time I finished building our first Mother Earth News heater, the original design:
It worked really well with kerosene and with biodiesel, but it wouldn't burn the biodiesel glycerine by-product, which we'd hoped it would do, but it quickly coked up. It did burn WVO (waste vegetable oil, used cooking oil), producing plenty of heat, but again it coked up quite quickly. Feasible, but too much cleaning involved.
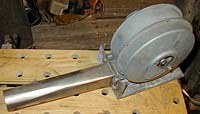
So I turned to Bruce Woodford's adaptation, which uses a forced air supply via a squirrel cage fan and a different burner design. Bruce says it reaches about 600-700 deg C (1,100-1,300 deg F) at the stovetop, a lot hotter than the original design, and it's obviously much hotter than that in the burner itself. (See Bruce Woodford's forced-air waste oil heater and Plan)
It's great for waste motor oil -- Bruce and his friends were unconcerned by the warnings last year from Richard Freudenberger, the original designer, that additives had raised the burning temperature of motor oil since the heater was designed and as a result it was no longer suitable for burning used motor oil. (See Note.)
But I had doubts it would burn the glycerine by-product, or at least give a clean and continuous burn without getting gunged up with a refractory soap residue. The elusive goal. Prof. Michael Allen told me he thought it needed a burning temperature in excess of 1,000 deg C (1,800 deg F) "and you will probably need a mean residence time in the Hot Box of about 5 seconds". And perhaps pre-heating and atomisation as well. See Burning glycerine
I followed Bruce's instructions carefully, but the new burner (right) didn't even like biodiesel, and it just went out when I tried WVO, let alone the glycerine by-product, though it worked well with kerosene. I decided that, no matter how well it might work with fossil fuels, the burner was all wrong for biofuels -- biofuels have much higher flash-points. I substituted the double frying-pan burner from the original design, fashioned a conical hood for the 2" forced-air supply pipe to fit over it, and tried again.
This worked very well with biodiesel, but much less well with WVO, so I didn't even try glycerin by-product. I made a 50-50 blend of WVO and biodiesel, and that worked just fine. I was testing it in the open backyard between the kitchen and the shed (workshop), it had been snowing and it was very cold, but it warmed the whole yard up, I had to take my coat off.
But, while we always have more WVO than we can use, plenty for winter heating fuel, I don't want to be making high-quality biodiesel all winter just for heating. The cost works out at not that much less than kerosene, which is about half the price of petroleum diesel fuel in Japan, and with time and labour added it's not worth it.
The main biodiesel cost component is the methanol. We get a good deal on it but it's still not cheap, and we can't get it any cheaper because there are restrictions here on how much you can store onsite. With 20% methanol needed to make the biodiesel, a 50-50 mix of WVO and biodiesel uses 10% methanol, too much. So I made some "biodiesel" with 5% methanol, using the single-stage base process and the titration amount of lye but with only 5% methanol. The glycerine by-product separated as it should, but not as much as usual and it was sludgier than the usual by-product.
But the fuel worked -- definitely not something you want to put in your car, but it burned very well in the new burner. I burned it for a few hours, with an amazing amount of heat output: it was outside and there was a frost, but the lower half of the heater was red-hot. And there was no ash or sludge buildup in the burner.
Maybe I can get that 5% even lower, down to 4% methanol or maybe less, but this is feasible as winter heating fuel. The fuel is just for heating, not driving, so there's no need to wash it. Quick and easy. We have enough excess methanol to recover from stored by-product to make about 600 litres of this bioheating oil, lots of winter heat essentially for nothing. See Bioheating oil
We've been using a small woodstove in the kitchen, which works well, it made all the difference in the cold months (and we have plenty of wood here), and we'd planned to put the WVO burner in the kitchen too, but it burns much too hot to have it inside the house. We'll have it outside instead, mounted inside a 200-litre oildrum, with a second fan blowing air into the oildrum and outlet pipes leading into the house under the floors and into the rooms. That will keep the whole house warm.
Keith Addison
Journey to Forever
8 Apr 2005
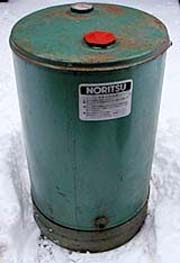
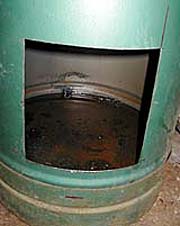
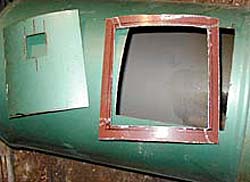
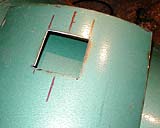
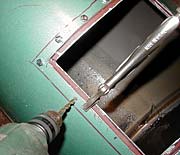
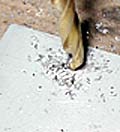
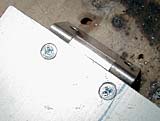
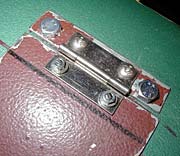
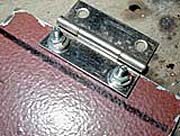
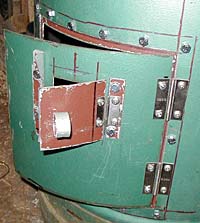
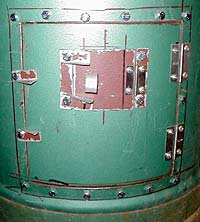
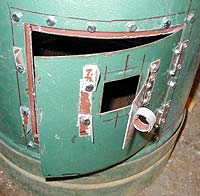
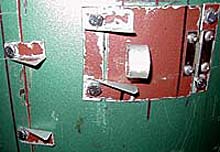
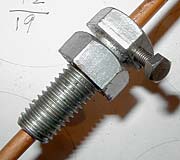
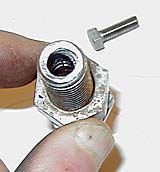
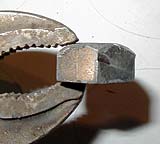
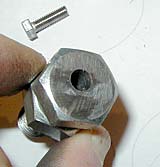
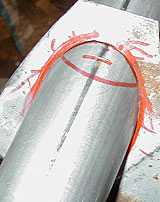
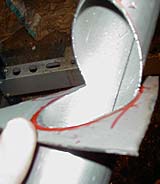
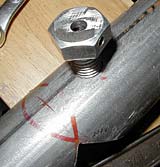
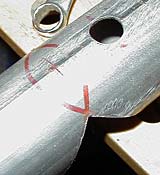
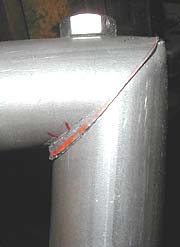
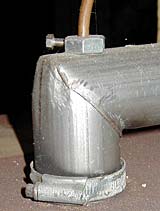
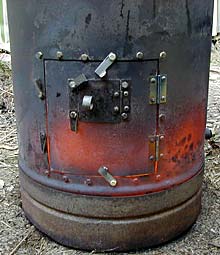
Left: Yet another 90-litre tank from a junked kerosene water heater. Above: Cut out the door (big enough for the burner unit to fit through). Above right: Use the cut-out as the door. Cut a steel backing from another tank, the opening 3/8" less all round than the door space. Right: Cut a hole in the door for the viewing window. Above: Drilling the holes to bolt the backing plate in place inside the door. Cut a shutter for the viewing window, 3/8" bigger all round than the window. Drill holes for hinge bolts, then countersink the holes on the inside (above left), so that the bolt is flush-fitting (above right and far right). Bolt the hinge on (left). Cut another strip of steel to fit under the other side of the hinge, and countersink these holes too. Bolt the hinge on, bolt the whole assembly to the door over the window. Cut another piece of steel for the other side of the shutter and bolt it to the door with clips to hold the shutter closed. Bolt two hinges to the door the same way. Bolt the backplate to the tank, with more clips to hold the door closed, and bolt on the door hinges. Detail below left. (We fitted more clips above and below the door later.) Maybe we could have used an ordinary plumbing tee-junction for the air-supply pipe (see Plan), but we used 2-inch car exhaust pipe instead of water-pipe, it didn't come with threads and we don't have a die for threads that size, so we did it another way. Above, above right and right is the drilled-out bolt we made to hold the fuel line in place in the top of the air-supply pipe, with a threaded hole cut in the side of the bolt head for the holding bolt. The nut, left, has to be rounded off to fit snugly inside the 2" pipe. Make a template (left) for a right-angle cut in the pipe -- it will have to be a bit less than 90 degrees to allow for overlap. Right and far right, fitting the template -- note the overlap at the top, to leave you a bit of the pipe to bend. Drill a hole for the fuel-line fitting, far left. Screw in the fitting, left, and fit the rounded nut inside the pipe, right. Above: File the V's deeper. On the left side, bend the edge of the pipe out, on the right, bend in at first and then out. Trim off any excess. Above right and far right: Carefully bend the pipe into a right-angle, tucking one side inside the other -- if you've done it right, they'll clip together firmly (left).
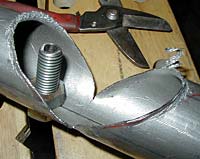
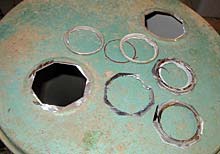
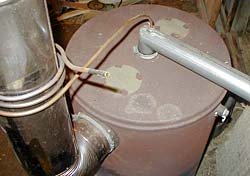
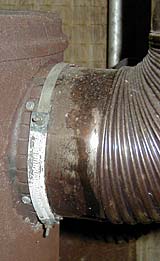
Top right: Cut off the tank fittings for the lid and the filler gauge; cover with flat metal plates screwed into place. Right: Cut the hole for the 2-inch air-sipply pipe in the centre of the tank; leave tabs and bend them up to secure the pipe in position. Cut a hole in the side of the tank for the flue.Above: Fit the pipe to the tank and clamp it in place round the upaised tabs with a stainless steel hose-clamp. Left: The flue is fitted the same way, along with some screws. Seal with refractory cement. The burner
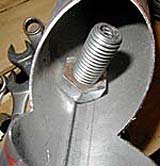
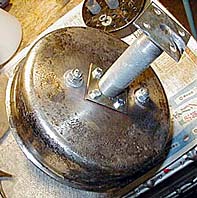
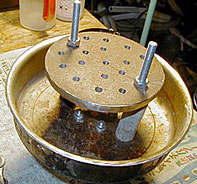
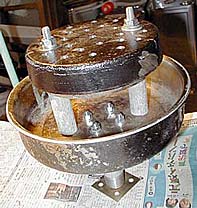
For use with biodiesel or bioheating oil, the heater uses the same burner as the original Mother Earth News design. The base of the burner unit is an 8" stainless steel frying pan with the handle stub ground off and the rim cut back. It stands on two steel plates with a 4" length of 1" water pipe between them. The 3/8" round steel burner plate is just less than six inches across and is perforated with 5/16" holes. It's supported by two 3-1/4" lengths of 1" steel water pipe held by "redi-bolts". The top of the unit is an inverted 6" cast-iron skillet with the handle cut off, perforated with 5/16" holes. It's held above the burner plate by two 1" lengths of 1" steel water pipe. The whole unit bolts to the floor of the heater. The air- and fuel-supply is from above, with the air-pipe ending in a conical hood above the burner. See How to build a funnel.
Left: The burner in action, with the hood lowered -- still hot after turning the blower off. Make the hood so that it will slide up the air-supply pipe to give access to the burner. Using the heater
Position the fuel tank higher than the heater for gravity feeding. Open the heater door, raise the hood. Fill the lower frying pan with perlite. Add a couple of hundred millilitres of kerosene and light with a match. Close the door, open the view window, turn on the blower, open the valve on the fuel tank, adjust to when the drips start changing to a stream. Close the window.
Sabtu, 31 Mei 2008
biofuel
Journey to Forever's forced-air biofuel heater


Langganan:
Posting Komentar (Atom)
Tidak ada komentar:
Posting Komentar